
Adding and designing workflows
This section provides instructions for adding and creating workflows.
Adding a workflow
To add a workflow:
- Switch to Monitor view by clicking the Monitor button in the top right of the Compose console.
-
Click the New Workflow toolbar button.
The New Workflow window opens.
-
To create a workflow with all current tasks, select Create default workflow and then click OK. Otherwise, continue from Step 4 below. Separate workflows will be created for Full Load and Change Processing tasks. The default workflow cannot be edited and will appear as Default Workflow in the list of monitored tasks.
Information noteTo update the default workflow with newly added tasks, repeat steps 2-3 above.
- Specify a name for your workflow.
- To create a workflow based on an existing workflow, select the Duplicate from check box and then select an existing workflow from the drop-down list.
-
Click OK to save your settings.
The <workflow_name> window opens.
- Continue from Designing a workflow below.
Designing a workflow
The workflow window is divided into two panes. The pane on the left (hereafter referred to as the Elements pane) is where you design your workflow and contains two default elements: Start and End.
The Elements pane contains gateways and tasks that you can use in your workflow. The following elements are available:
- Tasks - All existing Data Warehouse tasks, Data Mart tasks, and Command tasks.
-
Gateways - There are two types of gateway: Parallel Split and Synchronize. Use the Parallel Split gateway to create parallel paths. This is useful, for example, if you want two or more tasks to run in parallel.
Use the Synchronize gateway to merge parallel paths. The workflow waits for all the Tasks that precede the gateway to complete before continuing the flow.
To design a workflow:
- Drag the desired workflow elements from the Elements pane to the pane on the left.
- Arrange the elements in the order that you want them to run.
- Connect the elements to each other by dragging the connector from the gray dot (that appears on the right of an element when you hover the mouse cursor over it) to the target element. When a blue outline appear around the target element, release the mouse button.
-
Optionally add error paths to the workflow. The workflow will follow the error path if a task encounters an error. For example, if an error occurs with a Data Mart task, you may want to run another Data Mart task in its place.
To add an error path, hover your mouse cursor over the task element. A red dot will appears below the element. Drag the connector from the red dot to the target element, as shown below.
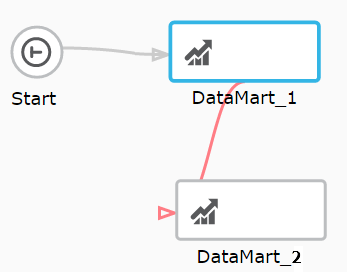
Connecting two error paths to the same task should be avoided as the workflow will fail if the task tries to run twice.